Robotic Surface Processing Software: Grinding, Milling & Additive | Surface Paths Module
The Automated Solution for Complex Surface Finishing
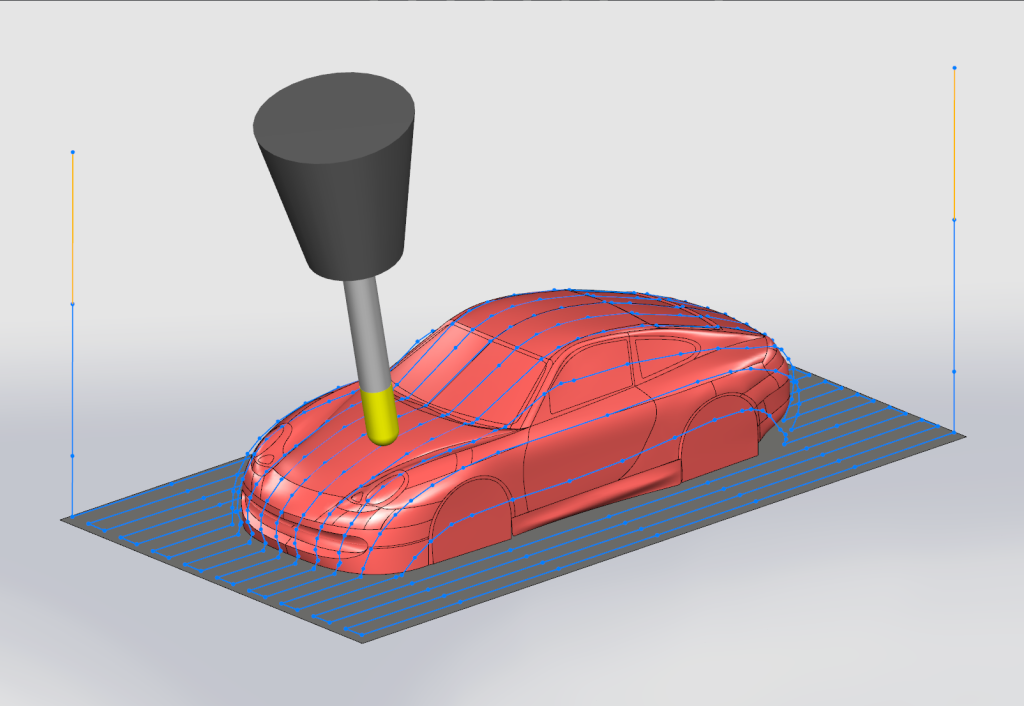
Stop Wrestling with Complex Curves. Master Them with “Click-and-Generate” Simplicity.
Processing complex 3D surfaces with a robot is notoriously difficult. Achieving a consistent finish requires more than just following a line—you need to control scallop height, manage variable speeds around sharp corners, and replicate the intricate motion patterns (like figure-8 or zig-zag) of a skilled craftsman.
The Robotmaster Surface Paths Module eliminates the guesswork. Instead of manual point teaching, the software analyzes your CAD model’s topology to generate smooth, optimized 6-axis motion.
One Module, Endless Applications:
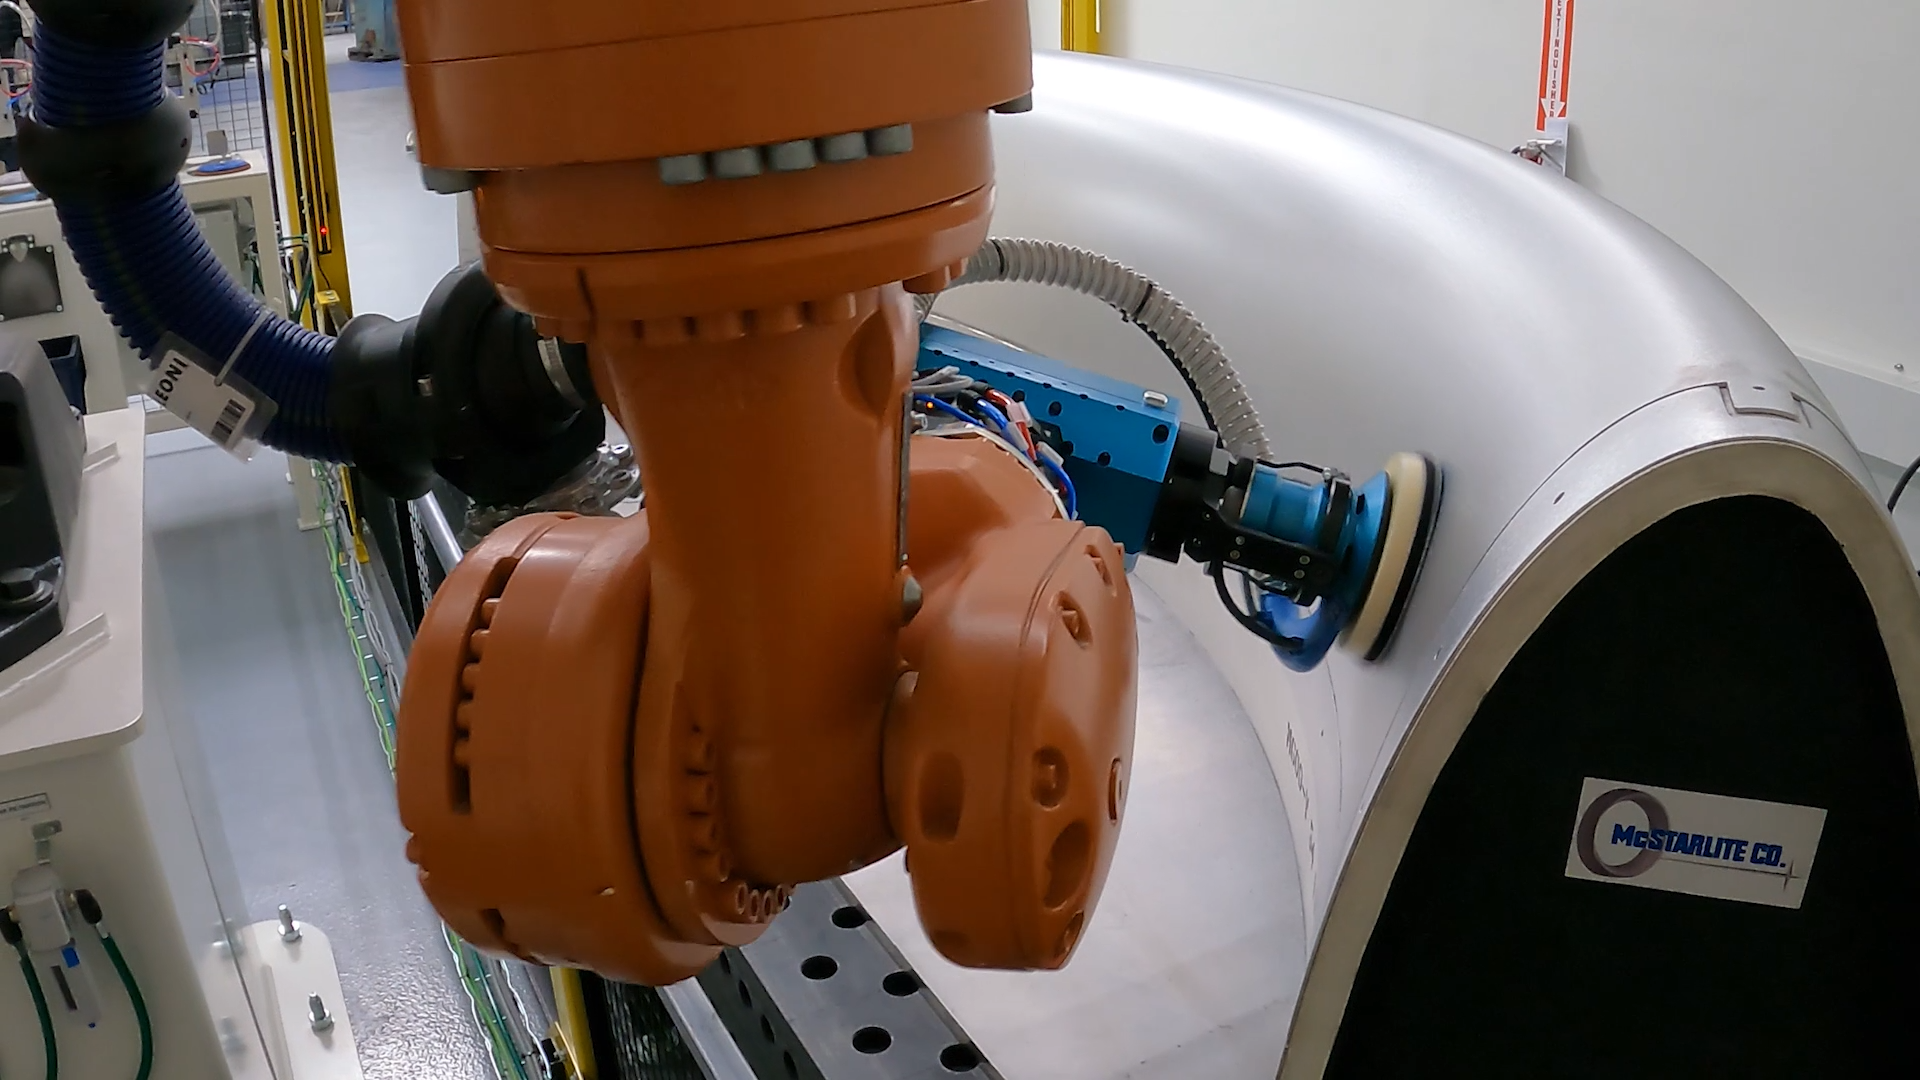
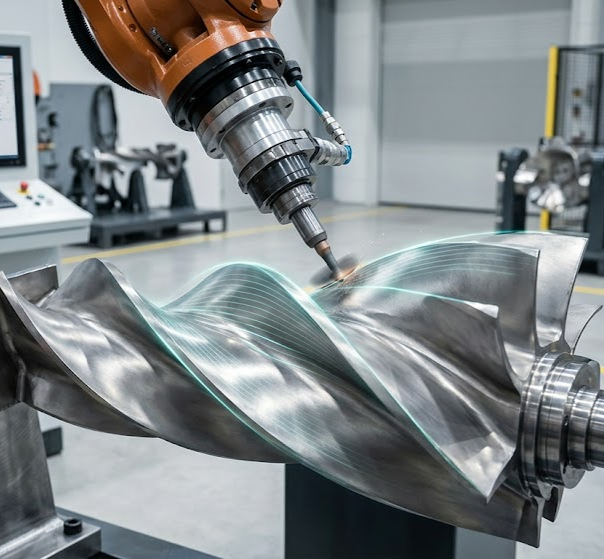
- Surface Finishing: Grinding & polishing turbine blades, sanding composite wings, and automated buffing.
- Coating & Inspection: Spray painting, thermal spraying, and non-contact surface inspection.
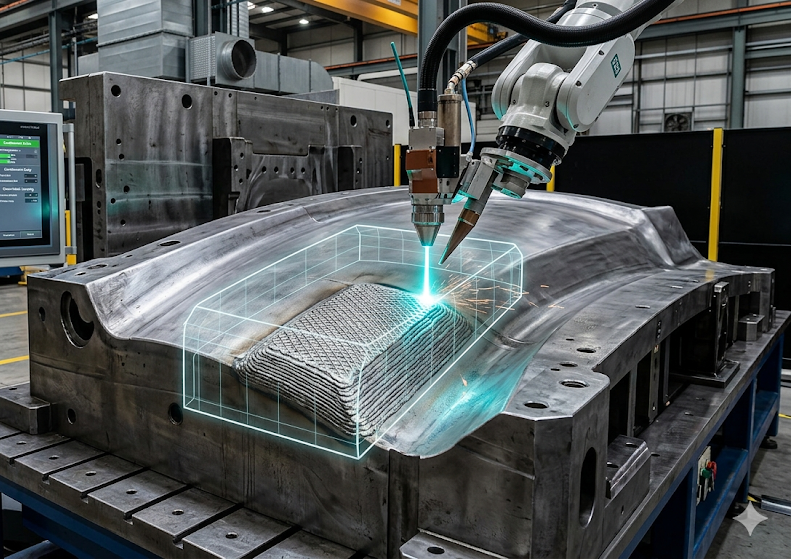
- Additive Manufacturing: Laser cladding on curved molds and repairing worn die sections.
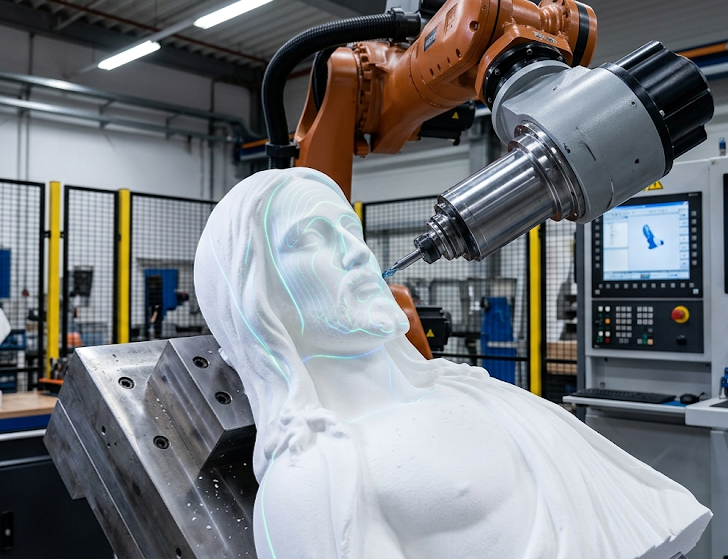
- Machining: 3D Profile Milling & Carving (complex reliefs, trimming, and surface engraving).
How to Create a Robotic Toolpath for Curved Surfaces | From CAD to Path in 3 Clicks
You don’t need to be a coding wizard to get a perfect finish.
We’ve stripped away the complexity:
- Pick your strategy: Choose the algorithm—like Morph or Parallel—that best matches the natural flow of your part.
- Click your surface: Simply select the target face on your 3D model.
- Compute the paths: Watch the path generate instantly.
The best part? You can verify the motion in our simulator immediately. If there’s a collision, you’ll see it before you ruin a part.
The 4 Pillars of Precision Surface Finishing
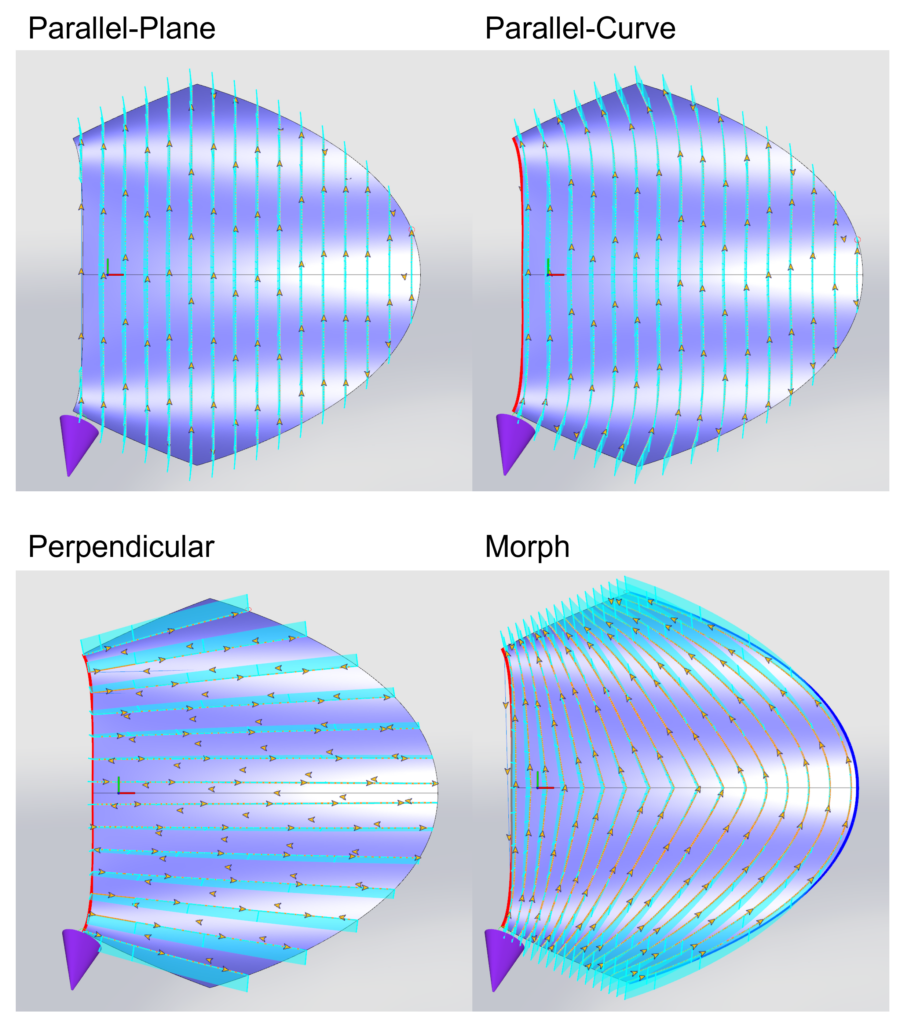
1. Smart Surface Topology & Path Strategies
Don’t force a square peg into a round hole. Our algorithms analyze your part’s natural curvature to generate the perfect flow.
- Geometry-Driven Strategies: Let your CAD model guide the path. Use Morph to smoothly blend the toolpath between two reference curves, or choose Parallel and Perpendicular strategies to drive the path using specific planes or curves.
- Pattern Versatility & Junction Control: Optimize for cycle time or finish quality. Switch instantly between Zig-Zag, Unidirectional (One-Way), or continuous Spiral motion. Also, you can seamlessly connect your passes using smooth Spline, straight Line, or retracting Disjoined junctions.
- Intelligent Cornering: Don’t burn your sharp edges. Use Loop strategies to create smooth outer radii, or Keep mode to roll the tool around corners while maintaining continuous contact.
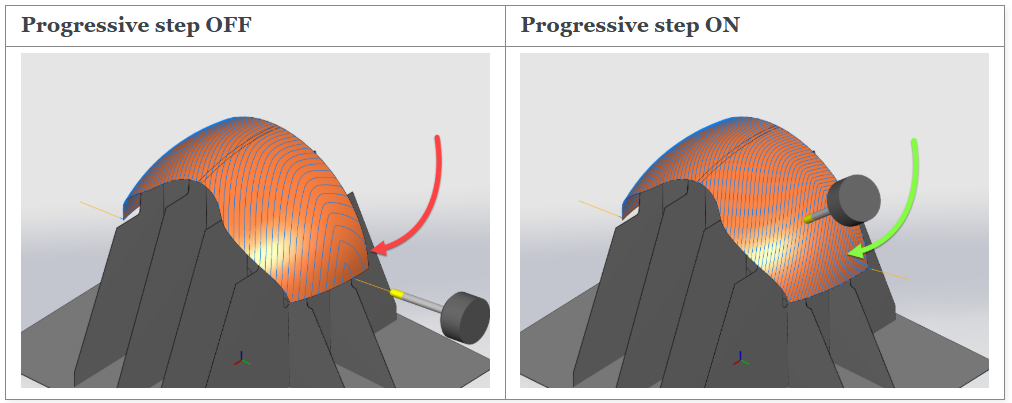
- Curvature Consistency: The Progressive Step feature automatically adjusts the path to maintain constant spacing, ensuring no gaps appear even on faces with sharp curvature changes.
Adaptive Robotic Toolpath Strategies
Progressive Step for Constant Path Spacing
2. Advanced Tool Contact & Motion Control
Grinding isn’t just about touching the surface; it’s about having precise control over the contact point. We provide the parameters needed to closely mimic manual finishing techniques with robotic repeatability.
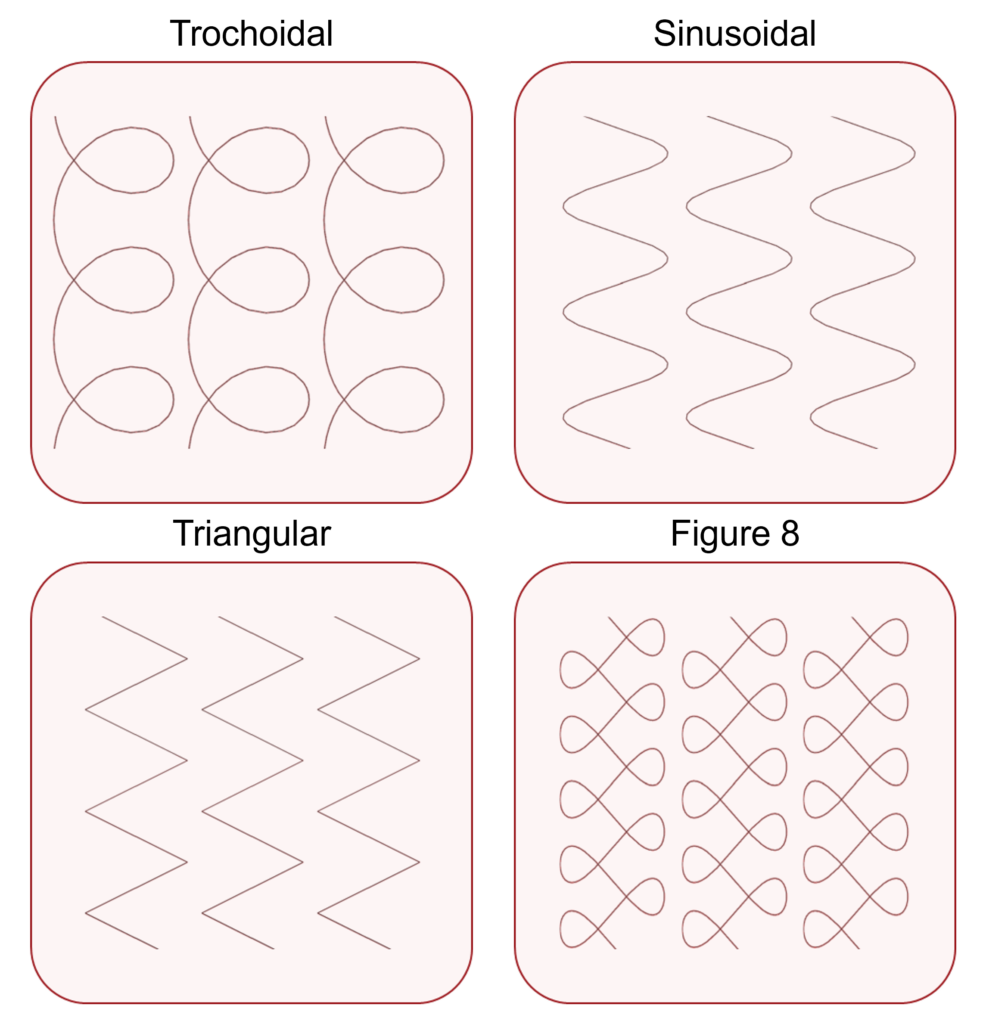
- Specialized Motion Patterns: Apply Trochoidal, Figure-8, or Sinusoidal overlays to your path. These complex motions accurately replicate the nuanced, multidirectional hand gestures of skilled craftsmen.
- Precise Tilting Angles: Adjust Lead/Lag and Side Tilt angles to define the exact tool contact point. For instance, apply a lead/lag tilt to avoid running parallel to the tangent direction and prevent premature mop delamination.
- Smart Contact Shifting: The exact center of a spinning tool has zero rotational speed. Use Front/Rear shift to move the contact point to the active edge instead. Additionally, apply a Surface Z-shift offset to safely reduce compliant system pressure against the part.
Mimic the Master’s Gesture-Path Patterns
3. Multi-Pass Layering & Containment
Easily stack, transform, and constrain your robotic paths in 3D space.
- Automated Process Stacking: Generate offset passes automatically by defining the Number of Layers and the Step Between Layers. This streamlines programming for applications requiring multiple stacked toolpaths.
- Volume Containment: Restrict the toolpath to a specific 3D volume using Containment Bodies. The software automatically trims intersections, so the robot processes only the required area, which is useful for localized repairs.
- Layer Transformations: Maximize programming efficiency for repeated features. Use the Copy/transform by pass or layer setting to easily duplicate, shift, or manipulate your toolpaths across multiple levels without reprogramming them from scratch.
4. Collision Avoidance & Path Safety
Automatically protect your equipment and parts while maintaining smooth, continuous toolpaths.
- Automated Tool Tilting: Keep operations running smoothly when interference is detected. The software can automatically adjust the tool’s tilt angle to clear obstacles while staying precisely on the programmed surface path.
- Trim & Retract Logic: Navigate around unavoidable obstructions with ease. The system automatically trims dangerous sections out of the toolpath, retracts to a safe clearance height, and seamlessly re-enters when the path is clear.
- Protective Geometries: Safeguard your work environment by defining clamps, fixtures, and surrounding structures as check geometries. The software guarantees your robot avoids these specific zones, preventing costly hardware crashes.
Automatic Tool Retract
Industry Applications
Aerospace | Turbine Blade Polishing
- Challenge: Exotic materials (Titanium/Inconel) that burn easily and complex twisted surfaces.
- Solution: Use Morph strategies to follow the blade flow and Progressive Lead/Lag to maintain optimal tool life.
Automotive | Mold Repair & Cladding
- Challenge: Adding material only to worn sections of a large die.
- Solution: Use Containment Bodies to restrict laser cladding paths to specific damage zones, and Cross-Hatch layering for structural strength.
Prototyping & Art | 3D Profile Milling & Carving
- Challenge: Machining complex organic shapes or 3D reliefs on curved surfaces without robot vibration marks.
- Solution: Use the Collision Avoidance function to map toolpaths onto the complex 3D topography.
Ready for exploring Surface Paths?
Stop struggling with manual teaching and inconsistent results. Let’s optimize your robotic process today.
Whether you need a virtual demo or on-site support, our global network of experts is ready to help.
Intercam SA is the authorized Global Distributor for Robotmaster® applications (except cutting) serving the USA, EMEA, and APAC regions.